
 |
PREAMBLE
The
Daguerreotype is a paradox: even if it is the most fragile among
all the photographic medias, it is very common to find some of them aged of
more than a century and a half and, in a pristine stage of conservation.
Unfortunately, other ones are is a poor shape; this is the case of many
French daguerreotypes. Fading portraits without contrast, the surface is
scratched or tarnished, some oxydation areas are visible, etc...
GOLDEN RULES
If you must remember something, it must be these three points :
|
F |
Never touch directly the surface of a daguerreotype,
even with a silk brush. |
|
F |
When it is started, the damage process of the surface of a
daguerreotype must be IMPERATIVELY stopped in order to avoid
the disappearance of the image within a short period of time. |
|
F |
Any damage to the surface of a daguerreotype is IRREMEDIABLE. |
MAIN CAUSES OF DAMAGE OF A DAGUERREOTYPE
The daguerreian image is inscribed on a thin plate in copper which has
been covered of a silver layer (3%), then polished such as a mirror before
being sensitized according to the process described by Daguerre.
 |
Direct contacts of the image surface
|
The daguerreian image inscribed on the surface of the silvered copper plate
is extremely sensitive to the external attacks. The air humidity, dusts,
brush, nails, finger prints... even the slightest contact with the image is
enough to immediately induce tarnish or scratch, unfortunately
irremediable.
In order to avoid such a risk, the daguerreian image must be always
covered with a cover glass with which it must remain interdependent
and sealed.
|
Sealing default
 In
the past, the sealing of a dag and its cover glass was made of glued
paper. In
the past, the sealing of a dag and its cover glass was made of glued
paper.
With the passing years, the glue is deteriorating and the paper does not
anymore stick on the parts. As both parts are no longer interdependant due
to
the lack of mechanical link, the rubbing of the glass onto the image surface
will damage this one.
More, the lack of sealing will facilitate the unexpected pollutions between
the daguerreian image and its cover glass : humidity, dusts,
micro-organisms and will induce tarnish spots onto the
surface of the image.
|
|
Broken cover glass
|
 This
is a frequent issue and the resulting damages remain visible even after all
required measures have been taken. When the cover glass is broken, its
parts remain in place due to the sealing paper which hold them together,
giving a false feeling of protection. This
is a frequent issue and the resulting damages remain visible even after all
required measures have been taken. When the cover glass is broken, its
parts remain in place due to the sealing paper which hold them together,
giving a false feeling of protection.
Due to the friction between the glass parts, a microscopic glass powder will
settle along the glass fissure and abrade the surface of the image. Air and
dust will also rush into this crack and induce tarnish.
|
Chemical decomposition of the old glass plates
|
More insidious are the damages linked to the nature of the old glasses used
for protection. With the passing years, some bubbles of solvent resulting
from the glass deterioration, appear in its structure. When they explode,
these solvent fumes are inducing on the surface of the image, a tarnish spot
which will enlarge itself with time.
REPLACEMENT AND RESEALING OF A COVER GLASS
Very often, the replacement and resealing of its
cover
glass are enough
to stop the causes of the progressive deterioration of a daguerreotype. In
addition, the general cleaning of the dag that is done at the same time,
conducts to a spectacular improvement of its look.
| Step #1 : List of materials
Nothing very difficult to find... You will need the following items : |
 1.
a bottle of distilled water
1.
a bottle of distilled water
2. air spray for dust removing
3. a decimetre
4. archivist gloves
5.
a towel
made of 100%
cotton
6.
a
container
7.
a
roll of Filmoplast ® P90 2 centimeters wide (*)
8.
the daguerreotype to be repaired
9.
two
spring clips
10. a pair of scissors
11. a flat knife (not represented)
(*) The
Filmoplast P90 is available in all good stationeries and is chemically
neutral.
Avoid common scotch tapes which are totally inappropriate for the
restoration purpose as they contain solvents and acids.
|
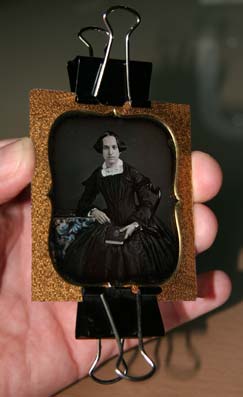
Step #2 : Removing a daguerreotype from its frame or case
|
The aim
is to remove the daguerreotype from its environment of display.
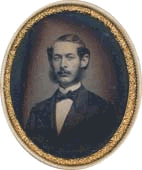
 If
the dag is French (see on the left), it is generally presented with a maroon
or blue passe-partout, decorated with a golden edging, and mounted within a
frame of black or gold If
the dag is French (see on the left), it is generally presented with a maroon
or blue passe-partout, decorated with a golden edging, and mounted within a
frame of black or gold
 color
and in a Napoleon
III style.
As these frames are quite rare, it is recommended to take care about them
during the dag removal operations. color
and in a Napoleon
III style.
As these frames are quite rare, it is recommended to take care about them
during the dag removal operations.
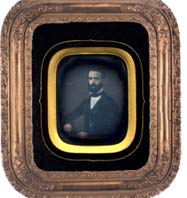
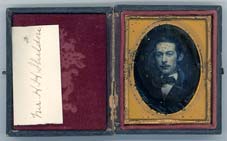
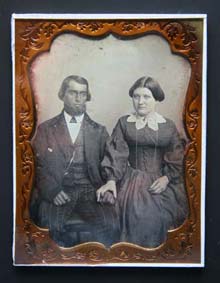
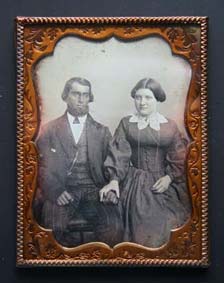
If the
dag is American or English (see on the right) , it is presented with a brass
mat and displayed in a special case decorated with velvet. Other
presentations are also possible : wooden frame in Japan, cardboard frame in
Mexico, etc...
Remark : when it exists, a passe-partout is always taken in a sandwich,
between the daguerreian image and the protection glass.
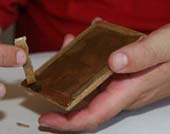
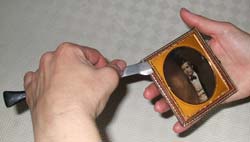 In
order to remove an American or English dag from its case, we usually use a
thin strip. You
must be
very
careful not creating a too excessive pressure in order to not break the
cover glass or the edges of the case. In
order to remove an American or English dag from its case, we usually use a
thin strip. You
must be
very
careful not creating a too excessive pressure in order to not break the
cover glass or the edges of the case.
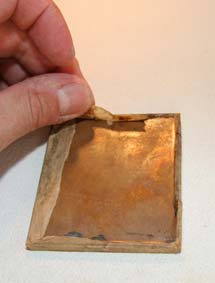
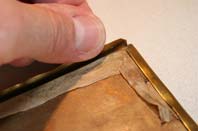 Some
daguerreotypes,
especially
American ones,
have an
additional brass frame which
hides
the paper
ensuring the sealing of the daguerreotype.
In order
to remove this brass frame, gently straighten out its borders as indicated
on the opposite photography. Some
daguerreotypes,
especially
American ones,
have an
additional brass frame which
hides
the paper
ensuring the sealing of the daguerreotype.
In order
to remove this brass frame, gently straighten out its borders as indicated
on the opposite photography.
|
Step #3 : Buy a new cover glass
|
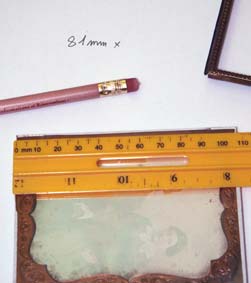
When
the dag has been removed from its frame or its case, it is possible to
precisely measure the size of its cover glass. Even if the sizes of
dags have been standardized, it is frequent that these ones do not match the
expected dimensions... Due to this, it is safer to take yourself the exact
measures of the cover glass which needs to be replaced.
You must be very careful when doing that; if not, you are taking the risk to
impact the quality of the sealing and more, to face the impossibility to
replace the dag back into its original frame or case.
When you will visit your mirror dealer, ask him
to cut a new cover glass having the exact dimensions you have measured.
The glass must be of an extra-clear and non-reflecting quality and having 2
mm thick.
Important, for security reasons, ask the dealer to sand down the cutting edges
of your new cover glass.
|
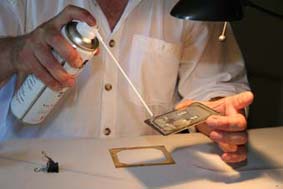
Step #4 : Cleaning of the new cover glass |
When you have your new cover glass, you must clean it to remove all
traces (i.e finger print) from its surface. Absolutely proscribe the use of
any alcohol-based product used for glass cleaning. They may damage the
surface of your precious dag.
Wash your new cover glass under the tap water. Put neutral soap on its two
sides and scrub it with your fingertips or a clean sponge. When you think
the glass has been cleaned enough, hold it by its edges and rinse it under
the tap water.
Still holding the glass by its edges, immerse it in container that you will
have first filled with distilled water. Do not drop the glass into
the container but gently move it into the bath to ensure its two sides will
be efficiently rinsed by the distilled water.
Take out the cover glass from its bath holding it by its edges and dry it
with the towel
made of 100%
cotton. Check if all the traces have disappeared from its
surface; if the result is not satisfactory, do not hesitate to redo the
whole process of cleaning from the beginning.
When the new cover glass appears cleaned enough, put it back on its edge in
a clean and dry location.
|
Step #5 : dismount of the daguerreotype and remove the old cover
glass |
 Did
you ever think about the emotion of the egyptologists who proceeded for the
first time to the removing of the wrapping of a mummie ? That is exactly
what you will feel at that point ! Did
you ever think about the emotion of the egyptologists who proceeded for the
first time to the removing of the wrapping of a mummie ? That is exactly
what you will feel at that point !
Facing such situation, your hands may become sweaty... If that is the case,
it is time for you to put your archivist gloves.
Remove the old glued paper from the back of the copper plate. Don't think
that because this paper
i s
aged of one century and a half, it will not resist too much.
Some times, this is exactly the
case, the old seals just crumble in your hands as you touch them with your
fingers. s
aged of one century and a half, it will not resist too much.
Some times, this is exactly the
case, the old seals just crumble in your hands as you touch them with your
fingers.
However, sometimes the exact
opposite is true: the glue holding the paper is completely intact, and the
paper seals are adhering to both the edge of the glass and to the back of
the dag as though they will never let go. In such a case, you have to cut
through the edge of the package using both hands and a flat knife. Carefully
control how much of the tip of a the flat knife you are allowing to
penetrate the paper seal as you cut around.
When you are feeling that the cover glass is no longer fixed to the
daguerreian image, remain focused on this last one as it is clearly the most
fragile part. Move away the cover glass and the passe-partout or the brass
mat. During all this operation, pay a lot of attention to always hold the
copper plate by its edges and ensure that your fingertips never touch the
daguerreian image.
Proceed like for the new cover glass : secure the daguerreian image in a
clean and dry location, being sure it is resting on its edge in order to
reduce the surface offered to flying dusts.
|
Step #6 : Cleaning operation
|
Before resealing together the daguerreian image, its passe-partout and its
new cover glass, you must proceed to the dusting of the different items.
Don't worry, this is a more meticulous step than really a difficult one.
First, you must ensure that no draft is disturbing the atmosphere of the
room. If a window is open, close it.
Using the air spray fitted with its extended diffuser, remove the dust from
the internal side of the cover glass (the one which will be in contact with
the daguerreian imahe), then pursue with the two sides of the passe-partout
or the brass mat, achieve this operation with the daguerreian image itself.

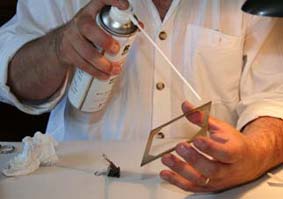
1. dusting of the cover glass
2. dusting of the passe-partout or the brass mat
3. dusting of the daguerreian image
Proceed with long and continuous spraying, moving always in the same
direction, from top to bottom.
Caution ! During spraying, the pressure of the gaz will decrease as well as
its temperature. So it is important to always keep the end of the diffuser
at a distance of 2 inches from the surface of the image to not freeze this
one. This phenomenon is without effet for the cover glass but may damage the
surface of the daguerreian image.
When they have been dusted, keep the cover glass and the passe-partout (or
the brass mat) close from you but keep them resting on their edges in order
to reduce the surface offered to flying dusts.
|
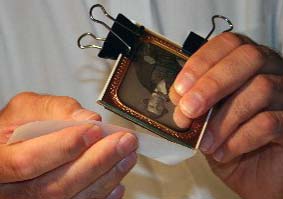
Step #7 : Reassembling the dag
|
If you have followed the explanations provided in step #6, you must have
your daguerreian image in your hand. Position your passe-partout (or brass
mat) over the daguerreian image while ensuring they remain not yet in
contact.
Check if the passe-partout (or the brass mat) stands at its exact location
over the image. If you are satisfied how it looks then, flatten the
passe-partout on the daguerreian image. To that point, your fingers must
ensure a sufficient pressure on the edges of the two parts (the cover glass
and the copper plate) in order they can not slide one over the other as it
would damage the daguerreian image.
With your free hand, use the air spray on this set in order to remove the
new dusts which could have reappeared onto its surface.
Take the cover glass and flatten it onto the passe-partout or the brass mat.
Ensure to apply the dusted side of the cover glass on the passe-partout or
the brass mat.
To that point, you must check again if new dusts are not infiltrated under
the cover glass. If it is the case, release the pressure of your fingers in
order to let the cover glass moving apart a little. Then, chase away the
eventual dusts with another spraying and replace the cover glass onto the
rest of the package.
Now, your fingers are immobilizing the 3 parts for a while, holding them by
theirs edges. You probably feel the numbness coming...
Do not panic ! That is here that the two spring clips will help. Apply the
first one on the top of the package and the second one on its bottom.
Proceed carefully, not releasing the spring clips too quickly as it may
damage the cover glass. When the two spring clips are in place, you can
release your fingers.
|
Step #8 : Resealing the dag and its cover glass
|
Because the next 100 years of the life of your dag will depend from the
quality of its making, this step is very important. The purpose is to ensure
that the package made of : the daguerreian image, its passe-partout and the
cover glass remain linked together and perfectly sealed to avoid
infiltration of air.
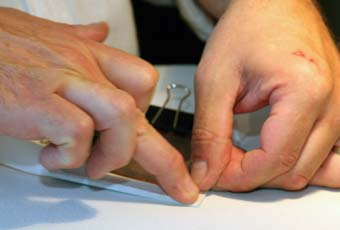
 Cut
a strip of Filmoplast ® P90 of a lenght a little longer than the
dimensions of the dag to be sealed. Caution, this strip must remain in one
part, and not cut in several ones, as its laying must be uninterrupted. The
Filmoplast is no more than a neutral (solvent free) scotch tape with a
sticking face protected with a film. It is not suitable to totally peel this
protective paper before proceeding to the sealing of the dag as the sticky
side of the Filmoplast would autoglue to itself during the operations. Cut
a strip of Filmoplast ® P90 of a lenght a little longer than the
dimensions of the dag to be sealed. Caution, this strip must remain in one
part, and not cut in several ones, as its laying must be uninterrupted. The
Filmoplast is no more than a neutral (solvent free) scotch tape with a
sticking face protected with a film. It is not suitable to totally peel this
protective paper before proceeding to the sealing of the dag as the sticky
side of the Filmoplast would autoglue to itself during the operations.
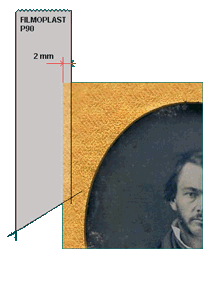
Peel the protection film from the Filmoplast on approximately 5 inches and
apply its sticky part on the edge of the glass, starting from one corner and
leaving a surplus of film. Ensure the Filmoplast does not cover the glass more than 2 mm at maximum.
This kind of sealing differs from what was made in the past. At that time,
the glued paper used to seal the daguerreotype was not coming over the cover
glass but was just in contact with the edges of this one.
When the strip of Filmoplast has been positioned
on the entire side, make a turn on the next side and let the rest of the
strip hang down into the void. Pull down the Filmoplast onto the back of the
cupper plate, starting from the corner you started from. While pulling down
the Filmoplast, apply some tension on the
film to ensure a better sealing of the package.
When the first edge is done, move the spring clip
to the edge which is facing the one you just seal. Then, peel the protective
film from the Filmoplast on another 5 inches and reiterate the same process
as describe before.
The folding of the Filmoplast in the corner of the daguerreotype requiers
some practice to obtain an acceptable result. The folding of the Filmoplast
must be at 45° for an attrative aspect.
Proceed like this for the four edges of the package. Complete the sealing by
pulling down the surplus of Filmoplast you have secured at the beginning of
the operation.
|
Step #9 : Reframing
|
On the back of the dag on the
resealing tape, write the date of the day
as well as the different operations of restoration you have done (new cover
glass, cleaning, etc...). Be
sure to use a very soft, lead pencil only . This is because a ball-point
pen, and even a hard-lead pencil, can actually dent the dag plate because
too much pressure is put onto the writing instrument tip and it presses down
into the plate surface (unintentional, for sure, but it really happens) and
pushes the plate surface up on the other side.
If it is a US or English daguerreotype, reinstall
the brass frame which must exactly hide the portion of the Filmoplast which
remains visible on the cover glass. At that point, you will realize why the
fold of Filmoplast must have 2 mm at maximum!).
Using the towel
made of 100%
cotton, and of course without any alcohol-based
product used for glass cleaning, clean the cover glass to remove any
eventual remaining fingerprints. Finally, reinstall the daguerreotype in its
case or frame.
It's over. Your daguerreotype is now ready to face the next 100 years !
|
Some useful links and references :
|
| www.casedimage.com |
Reproductions
of antic cases, passe-partout and brass mats - Do not look elsewhere,
they have all what you need and at the top quality ! (USA)
 |
|
Denis Waters Fine Daguerreotypes
|
If you don't feel
comfortable with the explanation provided here, Dennis' son Casey will
replace for you the old cover glass of your daguerreotype (Exeter - USA)
|
|
www.piaf-archives.org
|
PIAF :
International Portal of French-speaking Archivist
 |
| www.prophot.fr |
Specialist in archiving products for photography (Paris - France)
|
|
www.photo-conservation.ch |
Swiss Institut for the preservation of the photography (Neuchâtel - Switzerland)
|
| (re)Connaître et conserver les photographies anciennes |
Bertrand Lavédrine -
Didactic and scientific presentation of the main photographic
processes. A lost of good advices for a safe archiving of your old
photographies (ISBN : 978-2-7355-0632-3)
|
| Collector's guide to Early photographs |
O. Henry Mace
- A very interesting book about early photographic processes and their
archiving approaches
(ISBN : 0-87341-720-8)
|
|

